
Podcasting can be a mess—bad audio quality, editing that drags on, all that junk that makes you want to give up. I’ve been there, stuck with a podcast recording that sounded awful, asking myself why I even tried.
Then I got Adobe Podcast AI, and it’s like a your paid editor (which you can’t hire right now😉) who fixes things fast. It cleans your sound, cuts out background noise and echo, and gives you music and sound effects to add without any hassle.
New to this or been at it a while?
Doesn’t matter—it’s super easy.
Record your podcast, tweak it quick with some audio editing, and share it. That’s it.
No hidden fees or tricks, just your voice sounding good, no stress. It saves you time, keeps things simple, and lets you focus on what you want to say instead of fighting the tech. Perfect for anyone who wants a podcast production that doesn’t make them hate the process.
What is Adobe Podcast AI?
Adobe Podcast AI is a tool that makes podcasting way less of a hassle. It’s a web-based ai tool from Adobe that uses AI to help you record, edit, and share your podcast without tearing your hair out. I’ve messed with enough audio tools (not for podcasting, but for youtube videos and they are close, so i know the pain) to know the struggle—bad sound, fiddly edits, all that junk.
it cleans up your audio quality by removing background noise and echo, so you don’t sound like you’re recording in a cave. You can record straight in your browser, and it saves each speaker’s voice as its own track—handy if you’ve got guests. It even transcribes your podcast recording into text, so you can chop and tweak it like a Word doc instead of wrestling with waveforms. Plus, it’s got music and sound effects you can toss in, no royalties to worry about.
It’s tied to Adobe’s Creative Cloud, so you’ll need a login, maybe a subscription for the full deal, but some bits—like the noise fixer—are free to try. Right now, it’s still in beta, so it’s not perfect, but it’s already solid for quick, clean podcast production. You don’t need fancy gear or skills—just upload, let the AI do its thing, and download your audio editing results. Simple, fast, and no BS.
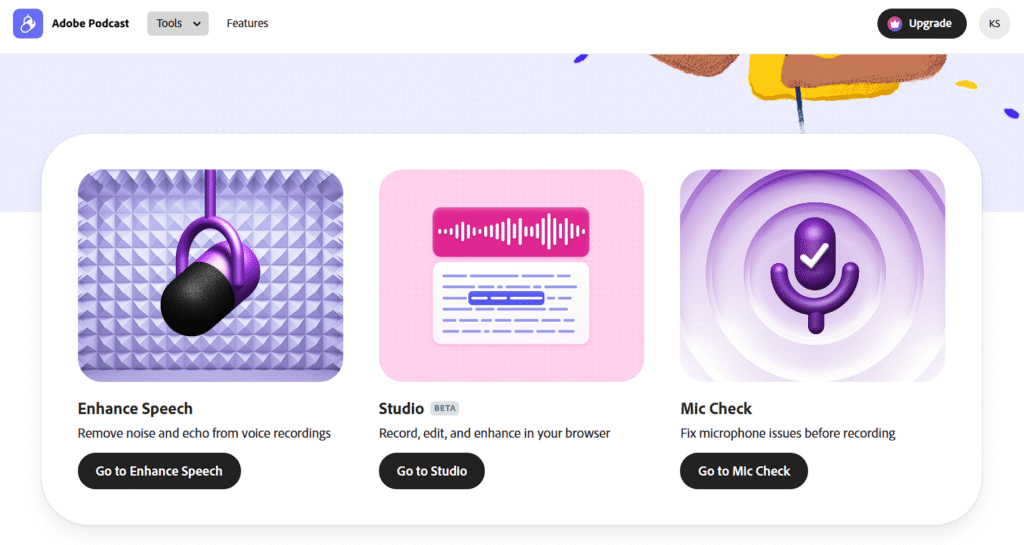
Key Features of Adobe podcast AI
Adobe Podcast AI comes loaded with tools that take the headache out of podcasting. Here’s the full rundown, keeping it real and simple:
1. Multi-Track Remote Recording
This feature records every participant on a separate audio track. If one guest experiences connection issues, only their track is affected while the others remain intact. This separation makes editing easier—each voice can be adjusted or fixed individually without disturbing the overall mix.
2. Automatic Transcription for Repurposing Content
It converts your recorded audio into text quickly, allowing you to create subtitles, blog posts, or social media snippets. While it supports several languages, it tends to work best with English, offering a handy way to make your content accessible and easier to reuse in different formats.
3. Noise Reduction for Studio-Quality Sound
The tool reduces background noise such as keyboard clicks or the hum of a fan while leaving your voice clear. This is particularly useful if you’re recording in an environment that isn’t perfectly quiet, ensuring your final audio remains clean and professional.
4. Mic Check for Optimized Recordings
Before you begin recording, the system tests your microphone setup. It checks for issues like picking up too much room noise or being placed too close or too far from the mic, then offers straightforward tips to adjust your setup. This helps ensure you start with the best possible sound quality.
5. Royalty-Free Music and Sound Effects
You have access to a library of music and sound effects that you can add to your podcast. Since these are royalty-free, you don’t have to worry about copyright issues, making it easier to enhance your podcast with intros, outros, or background elements.
6. Bulk Processing for Multiple Files
If you’re handling several episodes or segments, this feature lets you upload all your files at once. It processes them in the background, applying edits or enhancements automatically. This bulk handling saves a lot of time compared to processing each file one at a time.
7. Templates for Consistent Episodes
Pre-made templates are available for different types of shows—such as interviews, radio-style broadcasts, or educational content. These templates help maintain a consistent format across episodes, and you can also create your own setups to match your unique style, streamlining your production process.
8. Voice Style Customization
This feature allows you to fine-tune synthetic voices used for narration or extra audio elements. You can adjust aspects like pitch, speed, and tone to better match the overall feel of your podcast, making it useful for creating a more tailored and engaging audio experience.
9. High-Quality Recording
It records in a clean 16-bit 48kHz WAV format, capturing each voice separately. This means that even if someone’s internet connection is unstable, their audio remains high quality and isolated from others, simplifying later editing and ensuring a professional sound.
10. Browser-Based Editing
You can record and edit your podcast directly in your web browser without needing to install extra software. This streamlined approach makes the entire process more accessible and straightforward, so you can focus on your content rather than on technical hassles.
These features make Adobe Podcast AI a solid pick. It’s still in beta, but it’s already got the goods to streamline your work and sound pro without the fuss. Whether you’re fixing a messy podcast recording or setting up a smooth audio editing flow, it’s got your back.
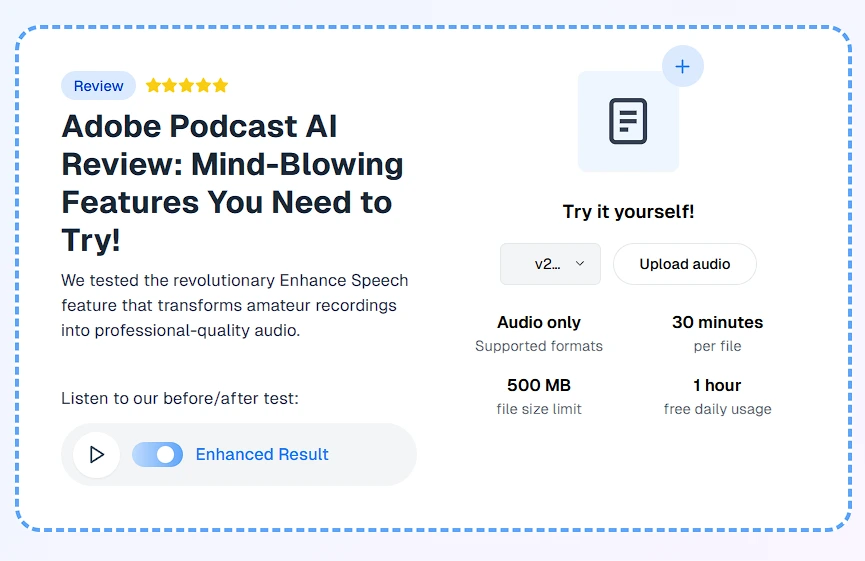
How to Enhance Speech with Adobe Podcast AI: Step-by-Step Guide
Adobe Podcast AI makes it easy to clean up your audio and get that pro sound without a ton of effort. Its Enhance Speech feature is the star here—great for fixing messy podcast recordings. Here’s how to use it, step by step, keeping it simple and straight:
Step 1: Get to Adobe Podcast AI
Open your browser—Chrome works best—and go to podcast.adobe.com. You’ll need an Adobe account, so sign in or make one if you don’t have it yet. It’s quick and free for the basic stuff.
Step 2: Find Enhance Speech
Once you’re in, look for the “Enhance Speech” option on the main page. It’s usually right there, easy to spot. Click it to get started.
Step 3: Upload Your Audio
Hit the “Choose Files” button—or drag your audio file straight in. It takes most formats like MP3, WAV, or M4A, but keep it under 500MB and 30 minutes if you’re on the free version. Got a longer podcast? Split it into chunks first.
Step 4: Let the AI Do Its Thing
Click “Enhance” and wait. The AI kicks in, stripping out background noise and echo while sharpening your voice. Takes a few minutes—maybe up to 10 for bigger files—but you don’t have to do anything. Just sit tight.
Step 5: Check the Result
When it’s done, you’ll get a preview. Play it to hear the difference. It should sound cleaner, like you recorded in a studio. If you’ve got the paid version (Adobe Express Premium, $9.99/month), you can tweak the strength of the effect—20%, 40%, whatever works.
Step 6: Download It
Happy with it? Click “Download” to save the enhanced file to your computer. That’s it—your audio quality is now way better, ready for your podcast production.
Extra Tips
- Free Limits: The free tier caps at 1 hour of enhancement per day and audio-only. Upgrade for video files or longer stuff (up to 4 hours daily, 1GB files).
- Fixing Bad Audio: If it sounds too processed, try a lower strength setting with the paid plan or mix it with your original in an audio editing tool.
- Mic Setup: Use the Mic Check feature before recording next time—it’ll help you avoid noise issues from the start.
That’s the whole deal. Upload, enhance, download—done. Adobe Podcast AI keeps it simple so you can focus on your podcast, not the tech.
You can watch this video on youtube for more information:
How to Perform Mic Check Using Adobe Podcast AI: Step-by-Step Guide
Adobe Podcast AI’s Mic Check feature helps you get your audio quality right before you even start recording your podcast. It’s quick, simple, and catches problems early. Here’s how to do it, step by step:
Step 1: Open Adobe Podcast AI
Fire up your browser—Chrome’s the best bet—and head to podcast.adobe.com. Sign in with your Adobe account. If you don’t have one, set it up—it’s free and takes a minute.
Step 2: Find Mic Check
On the main page, you will see that “Mic Check.” option, Click it to kick things off.
Step 3: Pick Your Mic
The tool pulls up a dropdown with all the mics your computer sees. Choose the one you’re using for your podcast recording. Make sure it’s plugged in first—USB mics or headsets work fine.
Step 4: Record a Test
Hit the “Record” button and talk for about 10-20 seconds. Say whatever—read a line, ramble about your day, doesn’t matter. Just keep it normal, like you’d sound on your podcast. Stop when you’re done.
Step 5: Get the Feedback
After you stop, the AI analyzes it fast—takes a few seconds. It’ll tell you what’s good or bad: mic distance (too close or far), gain (too loud or quiet), and if there’s background noise like fans or traffic messing things up.
Step 6: Adjust Based on Tips
You’ll see a score—green (good), yellow (meh), red (fix it). If it’s not green, it gives you tips: move the mic 6-12 inches from your mouth, turn down the gain, or shut a window. Tweak your setup and test again until it’s solid.
That’s it. Mic Check sets you up so your audio editing later isn’t a nightmare. Simple, fast, done.
How to Use Adobe Podcast AI Studio: Step-by-Step Guide
Adobe Podcast AI Studio is a web-based tool that lets you record, edit, and enhance your podcast right in your browser. Using the screenshots provided, here’s a clear, step-by-step guide to get started with the Studio feature, keeping it simple and practical for your podcast production.
Step 1: Access Adobe Podcast AI Studio
Open your browser—Chrome is recommended—and go to https://podcast.adobe.com/. Sign in with your Adobe account. If you’re new, create a free account. Once logged in, you’ll see a welcome screen like the one with “You’re in!” and a “New project” button. Click “New project” to enter Studio.
Step 2: Start a New Project
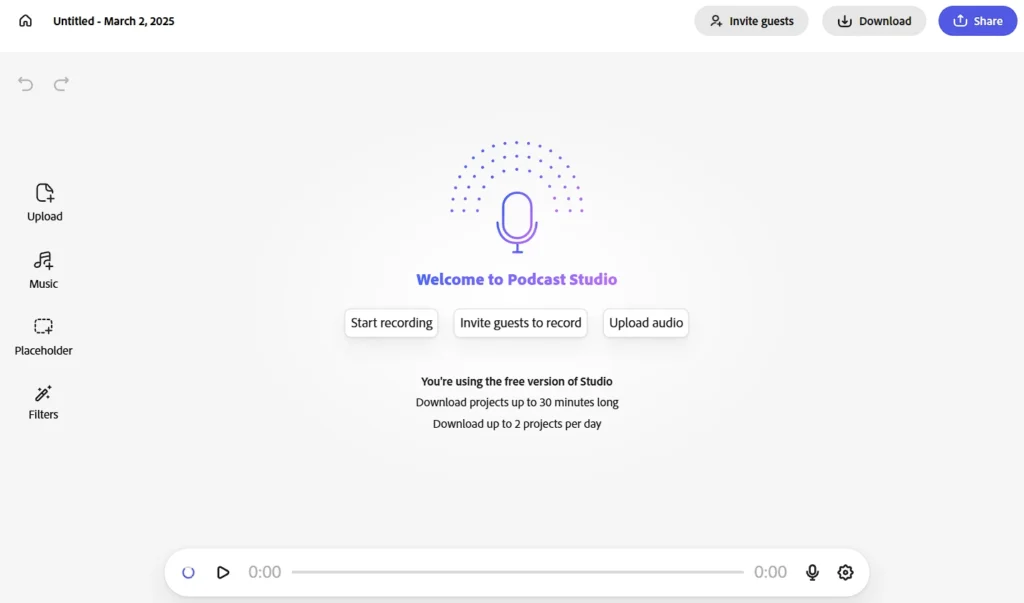
You’ll land on the Studio interface, showing “Welcome to Podcast Studio” with options like “Start recording,” “Invite guests to record,” and “Upload audio.” The free version lets you download projects up to 30 minutes long and up to 2 projects per day, as noted on the screen. Choose your action based on what you need.
Step 3: Record Your Podcast
Click “Start recording” to begin. A timeline appears at the bottom with a red record button and a mic icon, similar to the interface in the screenshots. Speak clearly, and the tool captures your audio quality in real-time. Use the “Pause” option if needed, as seen in the playback controls.
Step 4: Invite Guests (Optional)
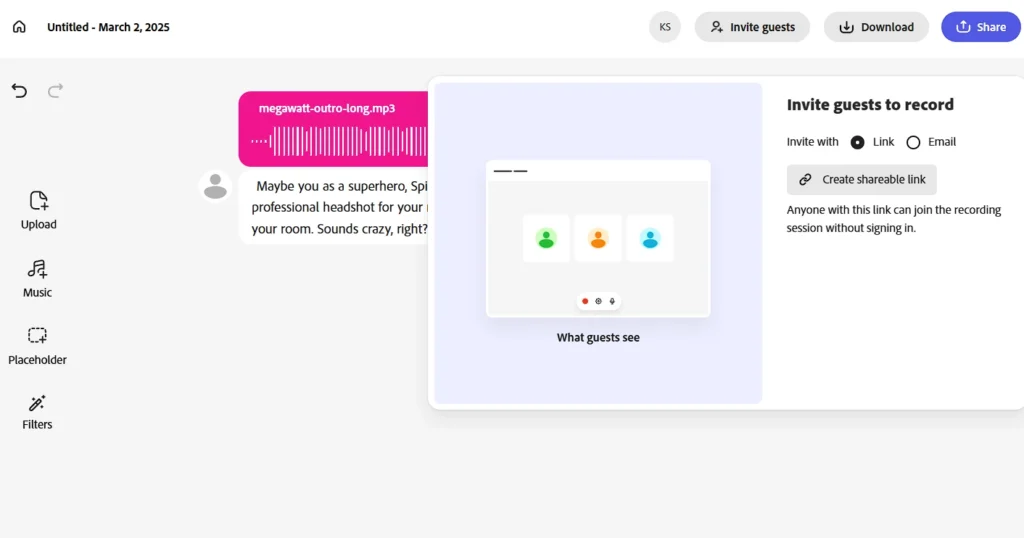
To add remote guests, click “Invite guests” in the top right. Select “Link” and click “Create shareable link.” Share this link with your guests—they can join the recording session without signing in, as shown in the “What guests see” preview. Their audio is recorded separately, even if their connection drops.
Step 5: Upload Audio Files
If you have pre-recorded audio, click “Upload audio.” The left sidebar has an “Upload” option—drag your file (e.g., MP3) into the space or use the button. The interface will display the file, like “megawatt-outro-long.mp3” in the screenshots, with a waveform for editing.
Step 6: Edit Your Recording
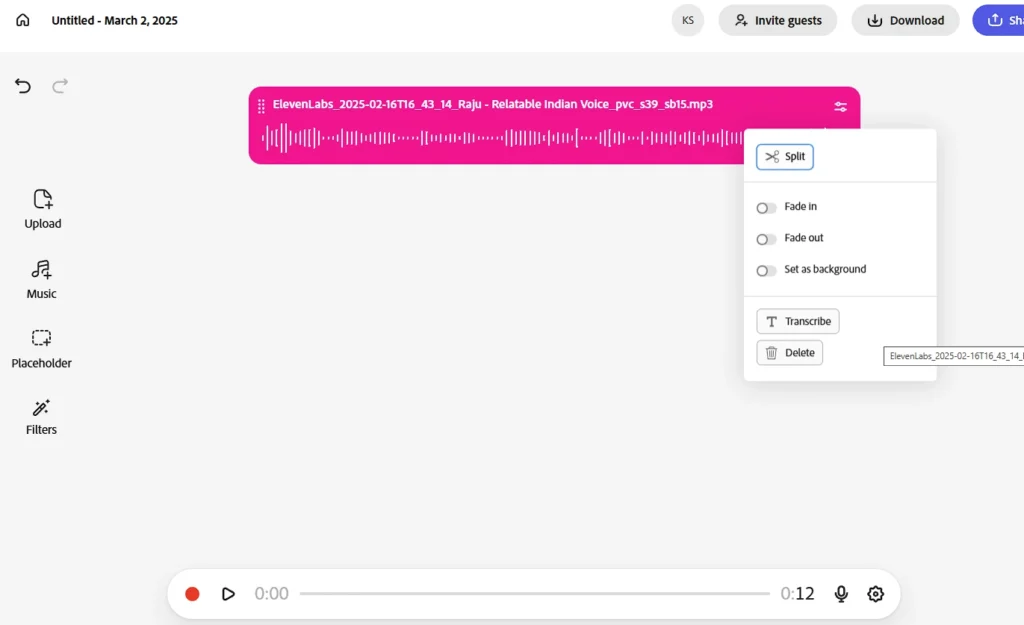
Once recorded or uploaded, the audio appears with editing options. Right-click the file to see choices like “Split,” “Fade in,” “Fade out,” “Set as background,” “Transcribe,” or “Delete,” as shown in the second screenshot. Use “Transcribe” to generate text for easy audio editing—cut or adjust by editing the transcript.
Step 7: Enhance Audio
Apply enhancements like noise reduction by selecting “Filters” from the sidebar, though specific options may require further clicks (not fully shown). This improves background noise issues, ensuring studio-quality sound.
Step 8: Add Music or Effects
Click “Music” in the sidebar to access royalty-free music and sound effects. Drag a track (e.g., from ElevenLabs) into your project. Adjust its placement or use “Set as background” for ambiance.
Step 9: Review and Download
Play back your project using the timeline controls at the bottom. Check the length (e.g., 0:12 or 0:26 in the screenshots) and listen for quality. When ready, click “Download” to save your podcast production file to your computer.
Extra Tips
- Free Limits: Stick to 30-minute projects and 2 downloads daily with the free version.
- Guest Management: Use the link option for easy guest access, but test it first.
- Editing: The transcript feature simplifies cuts—try it for quick fixes.
That’s it. Follow these steps to record, edit, and share your podcast using Adobe Podcast AI Studio, all without leaving your browser.
Benefits and Applications of Adobe Podcast AI
Adobe Podcast AI is your go-to tool if you want to make podcasting easier and more fun. Here’s when it works best for you and why you’ll love it.
Practical Applications
- Starting Fresh: New to podcasting? Use it with just a phone or basic mic—it turns your raw recordings into clear, pro-quality audio without needing a fancy setup.
- Teaming Up Remotely: Got guests far away? Record with them easily—the tool keeps everyone’s voices sharp, even if their internet wobbles.
- Reusing Your Content: Turn your episodes into blog posts or captions with a quick text conversion—perfect for reaching more listeners.
- Teaching or Sharing: Record lessons or tips, clean them up with noise removal, and share them—your audience will hear every word clearly.
- Building Your Brand: Create podcasts for your business with free music to add flair—great for promotions or stories.
- Telling Unique Tales: Record audio dramas or stories and tweak voices for a personal touch—your listeners will notice the difference.
- Handling Multiple Shows: Juggling several episodes? Process them all at once and save time.
Why You’ll Love It
- Saves Time: The AI handles noise cleanup and editing, so you can focus on what you love—your content.
- Sounds Amazing: Even basic recordings get a pro polish, no matter where you record.
- Easy to Use: Jump in with simple online tools and templates, perfect for beginners or pros.
- Budget-Friendly: The free version covers what you need without extra costs.
- Reaches More People: Text options and language support bring in new listeners.
- Fits Your Style: Works for solo projects or team efforts, adapting to your schedule.
Try Adobe Podcast AI when you want quick, high-quality results without the hassle. It’s perfect for anyone with limited gear or time, letting you share your voice with the world effortlessly.
Final Thoughts
Adobe Podcast makes high-quality podcast production more accessible, whether you’re a beginner or a seasoned creator. It streamlines audio editing, enhances voice clarity, and removes background noise, allowing you to focus on content rather than technical issues. Whether you’re recording solo episodes or managing remote guest interviews, the platform ensures professional-quality sound without requiring expensive equipment or complex software.
Its free audio tools, such as AI-powered noise reduction and automatic transcription, provide a strong foundation, while premium features unlock even more control over your production. Step-by-step tutorials help users navigate the platform, while multi-track recording and voice customization cater to advanced podcasters looking to fine-tune their sound.
Though still in beta, Adobe Podcast shows strong potential in simplifying podcast recording and editing. If you’re looking for an efficient way to enhance your podcasting workflow, explore its features, experiment with its tools, and take your content to the next level.